이번 글에서는 발급한 access token을 바탕으로 Zoom Meeting API를 이용해 회의실을 생성해볼 것이다.
access token 발급 과정은 지난 게시글을 참고하면 된다.
목차
1. Zoom App 생성
2. OAuth 2.0 설정
3. Zoom Meeting API
3-1. 전체 Flow 이해하기
우선 공식 문서를 따라 Create Meeting API 플로우를 이해해보자.
3-1-1. Endpoint

Endpoint에 필요한 path parameter 'userId는 me value라는 명칭으로 소개되고 있는데,
이는 user ID나 이메일 주소 값을 사용한다고 한다. 우리는 이메일 주소를 이용할 것이다.
3-1-2. Request Body
Zoom Meeting API는 다양한 요소를 Body에 포함할 수 있다.
나는 특정 시간에 열릴 회의실을 미리 만드는 것이 목표이므로, 아래의 요소들을 선택하였다.
| Field |
Type | Description | |
| agenda | string | The meeting's agenda. This value has a maximum length of 2,000 characters.
Constraints: Max 2000 chars
|
|
| default_password |
boolean | Whether to generate a default passcode using the user's settings. This value defaults to false. If this value is true and the user has the PMI setting enabled with a passcode, then the user's meetings will use the PMI passcode. It will not use a default passcode. Default: false
|
|
| duration |
integer | The meeting's scheduled duration, in minutes. This field is only used for scheduled meetings (2). |
|
| pre_schedule |
boolean | Whether to create a prescheduled meeting via the GSuite app. This only supports the meeting type value of 2 (scheduled meetings) and 3 (recurring meetings with no fixed time).
Default: false
|
|
| start_time | date-time | The meeting's start time. This field is only used for scheduled or recurring meetings with a fixed time. This supports local time and GMT formats.
|
|
| timezone | string | The timezone to assign to the start_time value. This field is only used for scheduled or recurring meetings with a fixed time. For a list of supported timezones and their formats, see our timezone list. Asia/Seoul 사용 예정 |
|
| topic |
string | The meeting's topic. Constraints: Max 200 chars
|
|
| type | integer | The type of meeting.
Default: 2
Allowed: 1┃2┃3┃8
|
|
3-1-3. Response
API 요청 결과는 다음과 같은 Status Code 케이스가 있다.
| 201 | 성공적으로 회의실 생성이 완료된 경우 |
| 400 | Bad Request |
| 404 | Not Found {userId} 정보의 사용자가 존재하지 않는 경우 |
| 429 | Too Many Requests |
201의 경우, 여러 데이터가 응답값으로 반환된다. (문서 참고)
이 중 우리가 사용할 데이터는 아래와 같다.
| Field | Type | Description | |
| host_email |
The meeting host's email address. | ||
| id |
integer | The meeting ID: Unique identifier of the meeting in long format (represented as int64 data type in JSON), also known as the meeting number. |
|
| created_at |
date-time | The date and time when this meeting was created. | |
| join_url |
string | URL for participants to join the meeting. This URL should only be shared with users that you would like to invite for the meeting. |
|
| password |
string | The meeting passcode. This passcode may only contain these characters: [a-z A-Z 0-9 @ - _ * !] If Require a passcode when scheduling new meetings setting has been enabled and locked for the user, the passcode field will be autogenerated in the response even if it is not provided in the API request. |
|
| start_time | date-time | The meeting's start time. This field is only used for scheduled or recurring meetings with a fixed time. This supports local time and GMT formats.
|
|
3-2. 코드 작성
3-2-1. application.yml
'me value' 값으로 사용할 호스트의 이메일 주소를 추가해둔다.
zoom:
  oauth2:
    issuer: https://zoom.us/oauth/token
    client-id: {{your_client_id}}
    client-secret: {{your_client_secret}}
    account-id: {{your_account_id}}
    api-url: https://api.zoom.us
  email:
     host: {{your-host-email}}  # 추가
3-2-2. ZoomMeetingCreateDTO.java
회의실 생성에 필요한 정보를 담은 DTO이다.
여기에 우리의 요구사항 (이러이러한 회의실로 만들어주세요~)을 담아서 요청할 것이다.
import lombok.Builder;
import lombok.Getter;

import java.io.Serializable;
import java.time.LocalDateTime;

@Getter
public class ZoomMeetingCreateDTO implements Serializable {

    private String agenda;

    private Boolean default_password = true;

    private Integer duration;

    private String start_time;

    private String timezone = "Asia/Seoul";

    private String topic;

    private Integer type = 2;

    @Builder
    public ZoomMeetingCreateDTO(String agenda, Integer duration, LocalDateTime startTime, String topic) {
        this.agenda = agenda;
        this.duration = duration;
        this.start_time = startTime.toString() + ":00";
        this.topic = topic;
    }

    public static ZoomMeetingCreateDTO of(String agenda, Integer duration, LocalDateTime startTime, String topic) {
        return ZoomMeetingCreateDTO.builder()
                .agenda(agenda)
                .duration(duration)
                .startTime(startTime)
                .topic(topic)
                .build();
    }
}
3-2-3. ZoomMeetingCreateResponse.java
생성된 회의실 정보를 받을 클래스를 만들어준다.
3-2-2 요구 사항이 잘 반영되었는지 확인하기 위해 아래 5가지 필드도 추가해봤다.
import lombok.Builder;
import lombok.Data;

import java.io.Serializable;

@Data
public class ZoomMeetingCreateResponse implements Serializable {

    private String host_email;

    private String id;

    private String created_at;

    private String join_url;

    private String start_time;

    private String password;


    // 3-2-2 확인용

    private String agenda;

    private Integer duration;

    private String timezone;

    private String topic;

    private Integer type;
}
3-2-4. ZoomMeetingApiHelper.java
본격적으로 Zoom Meeting 생성을 요청하는 부분이다.
createRequestDTO 메소드에서 나는 우리 서비스에서 정의한 'Program' 클래스의 데이터(type, title, th, startDate)를 바탕으로 회의실 요구사항을 작성해보았다. 해당 부분은 각자 자신의 상황에 맞게 수정해서 작성하면 된다.
핵심은 createMeeting 메소드이다.
import com.letsintern.letsintern.domain.program.domain.ProgramType;
import com.letsintern.letsintern.domain.program.dto.request.ZoomMeetingCreateDTO;
import com.letsintern.letsintern.domain.program.dto.response.ZoomMeetingCreateResponse;
import lombok.RequiredArgsConstructor;
import org.springframework.beans.factory.annotation.Value;
import org.springframework.http.HttpEntity;
import org.springframework.http.HttpHeaders;
import org.springframework.http.HttpMethod;
import org.springframework.http.ResponseEntity;
import org.springframework.stereotype.Component;
import org.springframework.web.client.HttpClientErrorException;
import org.springframework.web.client.RestTemplate;

import java.time.LocalDateTime;

@Component
@RequiredArgsConstructor
public class ZoomMeetingApiHelper {

    private final ZoomAuthenticationHelper zoomAuthenticationHelper;

    @Value("${spring.zoom.oauth2.api-uri}")
    private String zoomApiUri;

    @Value("${spring.zoom.email.host}")
    private String hostEmail;


    private ZoomMeetingCreateDTO createRequestDTO(ProgramType type, String title, Integer th, LocalDateTime startDate) {
        String description = type.getValue() + " #" + th + " " + title;
        return ZoomMeetingCreateDTO.of(
                description,
                180,
                startDate,
                description
        );
    }

    public ZoomMeetingCreateResponse createMeeting(ProgramType type, String title, Integer th, LocalDateTime startDate) throws Exception {
        ZoomMeetingCreateDTO requestDTO = createRequestDTO(type, title, th, startDate);
        String requestUrl = zoomApiUri + "/v2/users/" + hostEmail + "/meetings";

        RestTemplate restTemplate = new RestTemplate();
        HttpHeaders httpHeaders = new HttpHeaders();
        httpHeaders.add("Authorization", "Bearer " + zoomAuthenticationHelper.getAccessToken());
        httpHeaders.add("content-type", "application/json");

        HttpEntity<ZoomMeetingCreateDTO> httpEntity = new HttpEntity<>(requestDTO, httpHeaders);
        try {
            ResponseEntity<ZoomMeetingCreateResponse> responseEntity = restTemplate.exchange(requestUrl, HttpMethod.POST, httpEntity, ZoomMeetingCreateResponse.class);
            if(responseEntity.getStatusCode().value() == 201) {
                return responseEntity.getBody();
            }

        } catch (HttpClientErrorException e) {
            ResponseEntity<String> errorResponse = new ResponseEntity<>(e.getResponseBodyAsString(), e.getStatusCode());
            throw new Exception(
                    (String
                            .format(
                                    "Unable to get response due to %s. Response code: %d",
                                    errorResponse.getBody(),
                                    errorResponse.getStatusCode().value()
                            )
                    )
            );
        }

        return null;
    }
}
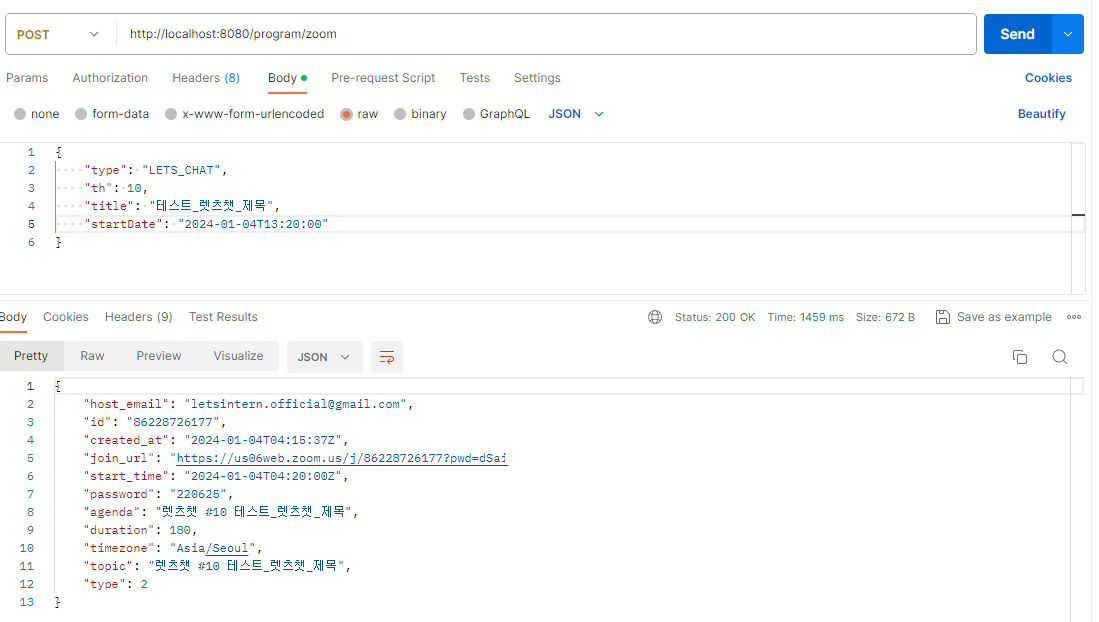
3-3. 결과 확인
간단한 DTO와 Controller를 통해 회의실 생성 요청 결과를 확인해보았다.
3-3-1. ZoomCreateDTO.java
import com.letsintern.letsintern.domain.program.domain.ProgramType;
import lombok.Getter;
import lombok.NoArgsConstructor;

import java.time.LocalDateTime;

@Getter
@NoArgsConstructor
public class ZoomCreateDTO {

    private ProgramType type;

    private Integer th;

    private String title;

    private LocalDateTime startDate;

}
3-3-2. Controller
@RestController
@RequiredArgsConstructor
@RequestMapping("/program")
@Tag(name = "Program")
public class ProgramController {

    private final ZoomMeetingApiHelper zoomMeetingApiHelper;

    @PostMapping("/zoom")
    public ResponseEntity<ZoomMeetingCreateResponse> zoom(@RequestBody ZoomCreateDTO requestDTO) throws Exception {
        return ResponseEntity.ok(zoomMeetingApiHelper.createMeeting(requestDTO.getType(), requestDTO.getTitle(), requestDTO.getTh(), requestDTO.getStartDate()));
    }
}
3-3-3. 결과
회의실 생성이 잘 이루어지는 것을 확인했다.
[참고 자료]
https://umes4ever.medium.com/getting-started-with-using-zoom-apis-936568034d52
[삽질 참고]
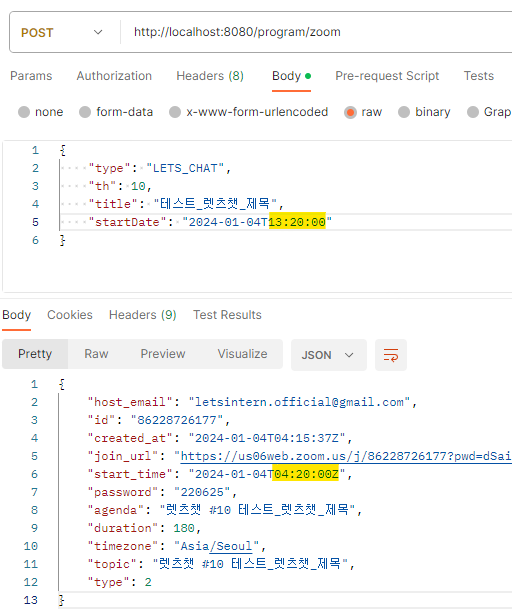
삽질 #1. start_time이 계속 created_at과 동일하게 설정되는 문제
아래 자료를 참고하여 시간 값을 HH:mm:ss 까지로 맞춰주니 해결되었다.
https://devforum.zoom.us/t/unable-to-correctly-pass-start-time-in-create-meeting-api/74272
Unable to correctly pass start_time in Create Meeting API
When calling the Create Meeting API, I’m scheduling a meeting with start_time selected from a calendar control, and passing it to the back-end for calling the API. app.post('/meeting', (req, res) => { console.log("Start date = " + req.body.start_time); /
devforum.zoom.us
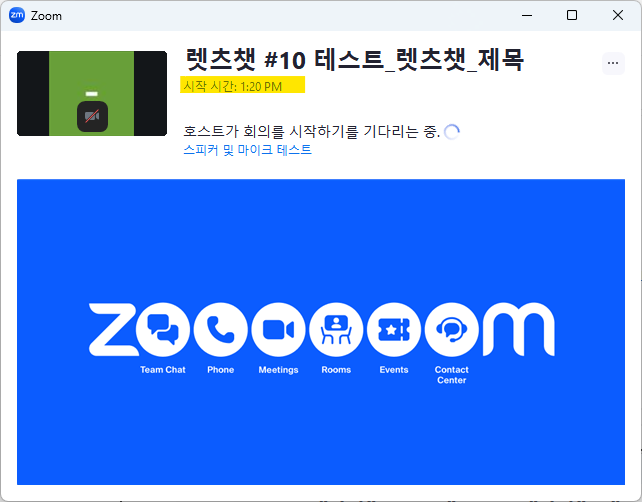
삽질 #2. start_time이 현재 로컬 시간과 다름
GMT 기준으로 보여지는 것 뿐이지, timezone 설정 시 입력한 로컬 시간대로 잘 생성된 것이다.
실제로 회의실 링크에 들어가보면 확인해볼 수 있다.
삽질 #3. pre_schedule = true 설정 시, join_url로 회의 참가 안됨 문제
아래의 자료를 참고하여 pre_schedule을 default값인 false로 설정하였다.
Meeting Creation - Appears to be successful but provides Invalid meeting ID
Description Using API to create meeting, appears to work providing expected result. However, meeting does not show up in account / list meetings and host / join URLs come back with invalid meeting ID. Error No error message on API call, trying to join give
devforum.zoom.us
'Spring > Spring Boot' 카테고리의 다른 글
| [Spring - OAuth2.0] 확장성 갖춘 소셜 로그인 구현 (0) | 2024.01.18 |
|---|---|
| [Spring Boot - Zoom] 회의실 자동 생성 #1. OAuth2.0 (0) | 2024.01.03 |
| [Spring Boot - Firebase] 연동하기 (0) | 2023.10.28 |
| [Spring Boot] 주기적 코드 실행 (0) | 2023.10.23 |
| [Spring Boot - JPA] Entity의 Default Value 지정하기 (0) | 2023.08.21 |


