Spring Boot 서버에서 Zoom 회의실을 자동 생성해보자.
이번 글은 Zoom REST API를 사용하기 위한 App 생성, OAuth2.0 설정 파트를 소개할 것이다.
목차
1. Zoom App 생성
2. OAuth 2.0 설정
3. Zoom Meeting API (다음 글에서 계속)
Environment
Java 17
Spring Boot 3.1.4
1. Zoom App 생성
1-1. Zoom App Marketplace 접속 및 로그인
App Marketplace
marketplace.zoom.us
1-2. Develop / Build App
Server-to-Server OAuth app을 생성해준다.
https://developers.zoom.us/docs/internal-apps/create/
Create a Server-to-Server OAuth app
The Zoom Developer Platform is an open platform that allows third-party developers to build applications and integrations upon Zoom’s video-first unified communications platform.
developers.zoom.us


1-3. Manage
Manage 페이지 접속 시, 방금 만든 App을 확인할 수 있다.
들어가서 정보를 추가로 입력한 후에 Activate까지 해야 설정이 완료된다.


1-4. Server-to-Server Role 열기
zoom marketplace가 아닌, 원조(?) zoom 사이트에 접속 후 로그인한다.
이후, 내 계정/관리자/사용자 관리/역할/소유자/고급 기능에서 서버간 OAuth 앱 관련 역할은 다 열어준다.

2. OAuth 2.0 설정
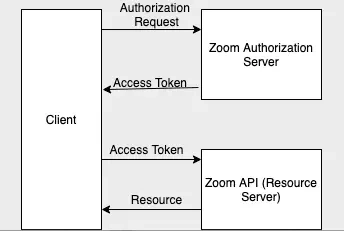
Zoom REST API를 이용하기 위해서는 OAuth2.0 관련 설정이 필요하다.
Server-to-Server app의 경우 refresh 토큰 없이, 3600s 만료 access 토큰만 발급한다는 특징이 있다. access 토큰을 발급받은 후, 해당 토큰을 통해 '나야~'를 인증하며 REST API를 이용하면 된다.
아래에서 access 토큰 발급 과정을 상세히 살펴보자.

(1) Endpoint
https://zoom.us/oauth/token
(2) Header
우선 client_id:client_secret 문자열을 base64로 인코딩한다.
이후 헤더를 다음과 같이 구성한다.
"Content-Type": "application/x-www-form-urlencoded",
"Authorization": "Basic [방금 인코딩한 client_id:client_secret 문자열]"
(3) Body
account_id를 이용하여 Body를 다음과 같이 구성한다.
"grant_type": "account_credentials",
"account_id": 1234
(1)의 Endpoint로 POST 요청을 보내면 아래와 같은 응답을 받을 수 있다.

{
      "access_token": "eyJhbGciOiJIUzUxMiIsInYiOiQE5Q-Iiwibm",
      "token_type": "bearer",
      "expires_in": 3599,
      "scope" : "user:read:admin"
}
이제 REST API 요청 시, 해당 access 토큰을 이용하여 헤더를 아래와 같이 구성하면 된다.
"Content-Type": "application/x-www-form-urlencoded",
"Authorization": "Bearer {{accessToken}}"
본격적으로 아래 페이지를 참고하여 Zoom 서버로부터 JWT 토큰을 발급받는 로직을 만들어보자.
https://developers.zoom.us/docs/internal-apps/s2s-oauth/
Server-to-Server OAuth
The Zoom Developer Platform is an open platform that allows third-party developers to build applications and integrations upon Zoom’s video-first unified communications platform.
developers.zoom.us
2-1. application.yml
zoom:
  oauth2:
    issuer: https://zoom.us/oauth/token
    client-id: {{your_client_id}}
    client-secret: {{your_client_secret}}
    account-id: {{your_account_id}}
    api-url: https://api.zoom.us
이때 account-id, client-id, client-secret은 Zoom Marketplace에 만든 App의 데이터를 넣어준다.

2-2. ZoomAuthResponse.java
Zoom 서버로부터 받아온 토큰 정보를 담을 ZoomAuthResponse 클래스를 만들어준다.
import com.fasterxml.jackson.annotation.JsonProperty;
import lombok.Data;

@Data
public class ZoomAuthResponse {

    @JsonProperty(value = "access_token")
    private String accessToken;

    @JsonProperty(value = "token_type")
    private String tokenType;

    @JsonProperty(value = "expires_in")
    private Long expiresIn;

    private String scope;

    public String getAccessToken() {
        return accessToken;
    }

}
2-3. ZoomAuthenticationHelper.java
본격적으로 Zoom Authorization Server에게 access token을 요청하는 코드를 작성해보자.

import com.letsintern.letsintern.domain.program.dto.response.ZoomAuthResponse;
import lombok.RequiredArgsConstructor;
import org.springframework.beans.factory.annotation.Autowired;
import org.springframework.beans.factory.annotation.Value;
import org.springframework.http.*;
import org.springframework.stereotype.Component;
import org.springframework.util.LinkedMultiValueMap;
import org.springframework.util.MultiValueMap;
import org.springframework.web.client.HttpClientErrorException;
import org.springframework.web.client.RestTemplate;

import java.util.Arrays;
import java.util.Base64;
import java.util.Calendar;
import java.util.TimeZone;
import java.util.concurrent.TimeUnit;

@Component
@RequiredArgsConstructor
public class ZoomAuthenticationHelper {

    @Value("${spring.zoom.oauth2.client-id}")
    private String zoomClientId;

    @Value("${spring.zoom.oauth2.client-secret}")
    private String zoomClientSecret;

    @Value("${spring.zoom.oauth2.issuer}")
    private String zoomIssueUrl;

    @Value("${spring.zoom.oauth2.account-id}")
    private String zoomAccountId;

    private ZoomAuthResponse zoomAuthResponse;

    private long tokenExpiryTime;

    public synchronized String getAccessToken() throws Exception {
        if(this.zoomAuthResponse == null || checkIfTokenWillExpire()) {
            fetchToken();
        }
        return this.zoomAuthResponse.getAccessToken();
    }

    /* 토큰 재발급이 필요한지 여부 확인 */
    private boolean checkIfTokenWillExpire() {
        Calendar now = Calendar.getInstance(TimeZone.getTimeZone("Asia/Seoul"));
        long differenceInMillis = this.tokenExpiryTime - now.getTimeInMillis();

        // 토큰 이미 만료 or 20분내 만료 예정
        if(differenceInMillis < 0 || TimeUnit.MILLISECONDS.toMinutes(differenceInMillis) < 20) {
            return true;
        }

        return false;
    }

    private void fetchToken() throws Exception {
        RestTemplate restTemplate = new RestTemplate();

        String credentials = zoomClientId + ":" + zoomClientSecret;
        String encodedCredentials = new String(Base64.getEncoder().encodeToString(credentials.getBytes()));

        HttpHeaders httpHeaders = new HttpHeaders();
        httpHeaders.setAccept(Arrays.asList(MediaType.APPLICATION_FORM_URLENCODED));
        httpHeaders.add("Authorization", "Basic " + encodedCredentials);
        httpHeaders.add("Host", "zoom.us");

        MultiValueMap<String, String> map = new LinkedMultiValueMap<>();
        map.add("grant_type", "account_credentials");
        map.add("account_id", zoomAccountId);

        HttpEntity<MultiValueMap<String, String>> httpEntity = new HttpEntity<>(map, httpHeaders);
        try {
            this.zoomAuthResponse = restTemplate.exchange(zoomIssueUrl, HttpMethod.POST, httpEntity, ZoomAuthResponse.class).getBody();
        } catch (HttpClientErrorException e) {
            ResponseEntity<String> errorResponse = new ResponseEntity<>(e.getResponseBodyAsString(), e.getStatusCode());
            throw new Exception(
                    (String
                            .format(
                                "Unable to get authentication token due to %s. Response code: %d",
                                errorResponse.getBody(),
                                errorResponse.getStatusCode().value()
                            )
                    )
            );
        }

        Calendar now = Calendar.getInstance(TimeZone.getTimeZone("Asia/Seoul"));
        this.tokenExpiryTime = now.getTimeInMillis() + (this.zoomAuthResponse.getExpiresIn() - 10) * 1000;
    }
}
2-4. 테스트
토큰 발급이 잘 되는지 확인하기 위해 간단한 컨트롤러로 테스트해보자.
@RestController
@RequiredArgsConstructor
@RequestMapping("/program")
@Tag(name = "Program")
public class ProgramController {

    private final ZoomAuthenticationHelper zoomAuthenticationHelper;

    @GetMapping("/zoom")
    public ResponseEntity<String> zoom() throws Exception {
        return ResponseEntity.ok(zoomAuthenticationHelper.getAccessToken());
    }

}
http://localhost:8080/program/zoom 접근 시, 발급된 access token이 잘 리턴되는 것을 확인할 수 있다.

다음 글에서는 발급한 access token을 통해 Zoom Create Meeting API를 활용해보자.
https://hyeminseo.tistory.com/203
[Spring Boot - Zoom] 회의실 자동 생성 #2. REST API
이번 글에서는 발급한 access token을 바탕으로 Zoom Meeting API를 이용해 회의실을 생성해볼 것이다. access token 발급 과정은 지난 게시글을 참고하면 된다. 목차 1. Zoom App 생성 2. OAuth 2.0 설정 3. Zoom Meeti
hyeminseo.tistory.com
[참고 자료]
Zoom API Java Client Server-to-Server OAuth — Spring Boot
The COVID 19 pandemic (a disease caused by SARS-CoV-2, the coronavirus that emerged in December 2019) hoisted so called Zoom platform as…
medium.com
'Spring > Spring Boot' 카테고리의 다른 글
| [Spring - OAuth2.0] 확장성 갖춘 소셜 로그인 구현 (1) | 2024.01.18 |
|---|---|
| [Spring Boot - Zoom] 회의실 자동 생성 #2. REST API (0) | 2024.01.03 |
| [Spring Boot - Firebase] 연동하기 (0) | 2023.10.28 |
| [Spring Boot] 주기적 코드 실행 (0) | 2023.10.23 |
| [Spring Boot - JPA] Entity의 Default Value 지정하기 (0) | 2023.08.21 |


